The Keezer Project
Alright. This is a bit of a departure from what I normally write about, but I had this grand scheme to convert an old freezer into a "keezer", also known as a kegerator, for the hubby for our anniversary this month (like he needs to drink more beer...).
I quickly realized that I would need some technical help. I found several good instructional tutorials online to accomplish this task, but the electrical components had me questioning if I could actually do this by myself. I contacted an engineer friend, who's also a home brewer, and he basically wrote me a novel on what I should look for and what I needed.
Then he said, "Well, if he's anything like me, he'll want to get in there and see how it all works."
That's when I realized it wouldn't be fair of me not to include my service technician (i.e. nerd) husband in the conversion of his own new toy. So I spilled the beans.
I located a small upright freezer on Craigslist; I went for upright instead of the chest style because I thought it would be easier to load with heavy kegs full of beer. The $50 asking price was reasonable, considering most of them were listed for $300-400, so I messaged the seller right away. We lucked out because someone had claimed it already but couldn't find a truck to pick it up with. We drove out to the middle of nowhere and picked it up; it fit beautifully in the back of our hand-me-down Lincoln Aviator (who needs a truck!?!).


We got it home and started inspecting our purchase. Ha! It was built in 1988! It's older than I am... So long as it works! There's also something magical about two 8's... 808... ya know.

We began discussing how many of the shelves we'd have to remove to fit a couple old soda kegs in it... then we realized something strange. The shelves themselves were actually the cooling coils! So much for removing any of them... they're all connected and have coolant running through them. Nowhere had I seen any warnings of looking out for this type of freezer on the keezer/kegerator instructables! We had to get creative...


Since removing any of the shelves wasn't an option, we carefully bent them up along the back of the freezer, being very cautious not to kink or break any of the coils. The upper shelf had to be modified even more and bent upward into a curve to provide the most space possible for the kegs. Everything was zip tied into place... then we plugged it in to make sure it still worked. It did! Speed bump averted.
Then we got to work on cleaning the freezer. It didn't smell too pretty... the previous owners had told us they only reason they got rid of it was because the steer they just butchered wouldn't fit in it, so they had to buy a bigger one. Eew. Ok, so there has been a lot of meat in this thing over the years. No more! Welcome to a vegetarian existence, freezer. :)

Clearly, we'd need somewhere to mount the taps. We figured we could fit three Cornelius kegs (AKA soda kegs) in the freezer at full capacity, plus the CO2 tank. I measured out a horizontal line right in the center of one of the inner door shelves (wouldn't want to accidentally drill through the shelf itself), then evenly spaced three vertical lines across the center of the door to mark our center points.

We used a one inch hole saw to cut perfect little holes in the door, which was super-duper easy. The thin aluminum cut like butter, and there was only a small layer of insulation and plastic behind it. DO BE CAREFUL though- you need to be sure that there are no cooling coils inside the walls of the freezer if you're going to drill into it. That would be a major bummer. We knew that since the shelves inside the freezer were the actual coils in our freezer, there would be no other coils within the walls or door.

Next came paint. Looking back, I should have known it was a bad idea, but we bought hammered finish spray paint in gunmetal black to make this thing look rad. Ugh. Spray paint on large flat surfaces is a pain in the butt- especially when there are a zillion little gnats flying around.

If I were to do it again, I'd just grab some pearly black paint and use a roller to apply it. Lesson learned. Oh well. It's black and sufficiently rad for our purposes. I also want to stencil a big Brewery 808 logo onto it, but for now it's in our basement to keep it out of the elements until we can finish it up.
I left the technical details to the electronics guru. He had purchased a temperature controller online a while back in aspirations that we'd someday build a keezer (see... I pay attention to what he wants!), and he got to work hooking it up. We had accidentally cut the temperature probe off when we were prepping the freezer, so we had to hard wire the grounds back together before it would work. Fortunately, the new temp controller replaced the need for the probe anyways, so no harm there. I don't know exactly what was done to hook this thing up (sorry!), so this is perhaps not the best place to go for technical details. I'm more into making it look pretty. :)
So, currently, the keezer works, but it still lacks kegs and taps.Well... we do have one tap set that my brother bought Neil for Christmas last year... but obviously it doesn't do any good without a keg.
It works darn well to keep bottled beer cold and to "cold crash" batches of beer when they're ready to bottle (this causes the yeast and/or hop chunks to "crash" to the bottom, making it less likely to get sucked up with the siphon put into the bottles with the beer). One of these days we'll get our paws on a keg or two, and then it will be game on!
I quickly realized that I would need some technical help. I found several good instructional tutorials online to accomplish this task, but the electrical components had me questioning if I could actually do this by myself. I contacted an engineer friend, who's also a home brewer, and he basically wrote me a novel on what I should look for and what I needed.
Then he said, "Well, if he's anything like me, he'll want to get in there and see how it all works."
That's when I realized it wouldn't be fair of me not to include my service technician (i.e. nerd) husband in the conversion of his own new toy. So I spilled the beans.
I located a small upright freezer on Craigslist; I went for upright instead of the chest style because I thought it would be easier to load with heavy kegs full of beer. The $50 asking price was reasonable, considering most of them were listed for $300-400, so I messaged the seller right away. We lucked out because someone had claimed it already but couldn't find a truck to pick it up with. We drove out to the middle of nowhere and picked it up; it fit beautifully in the back of our hand-me-down Lincoln Aviator (who needs a truck!?!).


We got it home and started inspecting our purchase. Ha! It was built in 1988! It's older than I am... So long as it works! There's also something magical about two 8's... 808... ya know.

We began discussing how many of the shelves we'd have to remove to fit a couple old soda kegs in it... then we realized something strange. The shelves themselves were actually the cooling coils! So much for removing any of them... they're all connected and have coolant running through them. Nowhere had I seen any warnings of looking out for this type of freezer on the keezer/kegerator instructables! We had to get creative...


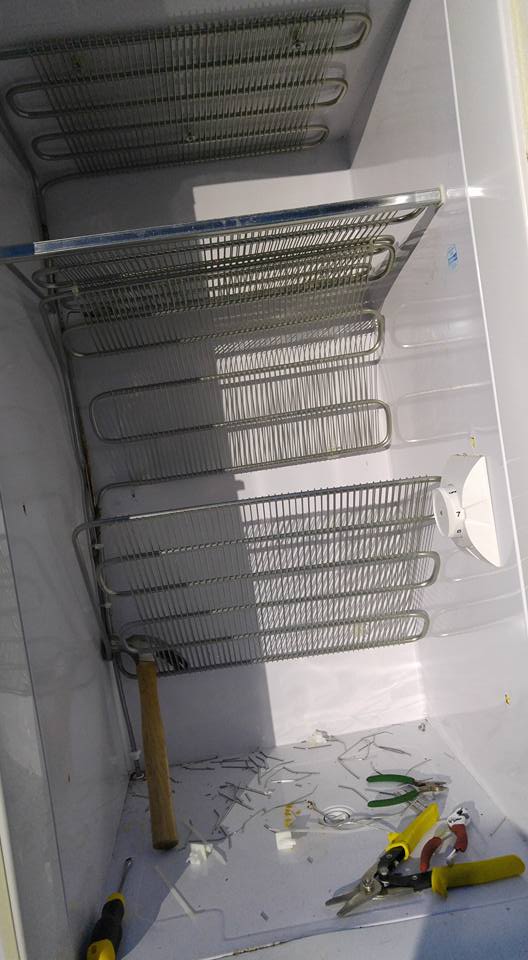 |
| The hammer helped us not kink the coil... |

Since removing any of the shelves wasn't an option, we carefully bent them up along the back of the freezer, being very cautious not to kink or break any of the coils. The upper shelf had to be modified even more and bent upward into a curve to provide the most space possible for the kegs. Everything was zip tied into place... then we plugged it in to make sure it still worked. It did! Speed bump averted.
Then we got to work on cleaning the freezer. It didn't smell too pretty... the previous owners had told us they only reason they got rid of it was because the steer they just butchered wouldn't fit in it, so they had to buy a bigger one. Eew. Ok, so there has been a lot of meat in this thing over the years. No more! Welcome to a vegetarian existence, freezer. :)

Clearly, we'd need somewhere to mount the taps. We figured we could fit three Cornelius kegs (AKA soda kegs) in the freezer at full capacity, plus the CO2 tank. I measured out a horizontal line right in the center of one of the inner door shelves (wouldn't want to accidentally drill through the shelf itself), then evenly spaced three vertical lines across the center of the door to mark our center points.

We used a one inch hole saw to cut perfect little holes in the door, which was super-duper easy. The thin aluminum cut like butter, and there was only a small layer of insulation and plastic behind it. DO BE CAREFUL though- you need to be sure that there are no cooling coils inside the walls of the freezer if you're going to drill into it. That would be a major bummer. We knew that since the shelves inside the freezer were the actual coils in our freezer, there would be no other coils within the walls or door.

 |
| TOOOOOOOLS |
Next came paint. Looking back, I should have known it was a bad idea, but we bought hammered finish spray paint in gunmetal black to make this thing look rad. Ugh. Spray paint on large flat surfaces is a pain in the butt- especially when there are a zillion little gnats flying around.

 |
| It looks better after another coat... I promise. |
If I were to do it again, I'd just grab some pearly black paint and use a roller to apply it. Lesson learned. Oh well. It's black and sufficiently rad for our purposes. I also want to stencil a big Brewery 808 logo onto it, but for now it's in our basement to keep it out of the elements until we can finish it up.
I left the technical details to the electronics guru. He had purchased a temperature controller online a while back in aspirations that we'd someday build a keezer (see... I pay attention to what he wants!), and he got to work hooking it up. We had accidentally cut the temperature probe off when we were prepping the freezer, so we had to hard wire the grounds back together before it would work. Fortunately, the new temp controller replaced the need for the probe anyways, so no harm there. I don't know exactly what was done to hook this thing up (sorry!), so this is perhaps not the best place to go for technical details. I'm more into making it look pretty. :)
 |
| Eventually this will be flush mounted to the freezer... but for now, this works! |
So, currently, the keezer works, but it still lacks kegs and taps.Well... we do have one tap set that my brother bought Neil for Christmas last year... but obviously it doesn't do any good without a keg.
 |
| Lonely tap parts... just waiting. |
It works darn well to keep bottled beer cold and to "cold crash" batches of beer when they're ready to bottle (this causes the yeast and/or hop chunks to "crash" to the bottom, making it less likely to get sucked up with the siphon put into the bottles with the beer). One of these days we'll get our paws on a keg or two, and then it will be game on!

Comments
Post a Comment