Posts

Showing posts from May, 2017

Closet Update: Wood shelves are finished!

Image
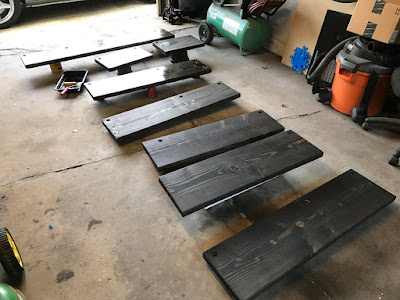
I can see the light! I spent two whole days this past weekend bouncing back and forth between putting coats of polyurethane on shelves and scrubbing the slime layer off of my steel pipe parts. The shelves look "badass" in my husband's terminology... They're rich and deep and shiny, which is pretty cool. The gloss was actually unintentional; I wouldn't have minded a matte finish on these, since the vibe is industrial to start with, but I just grabbed whatever gallon of polyurethane we had lying around in the basement. It just so happened to be a semi-gloss (not sure where we got it from) that we used on our floors about six years ago when we moved in. Lucky for me it was still good, and I was able to save some bucks and help put a dent in the clutter.         Poor "90's Junk" spent the weekend outside... I laid the shelves out, tops up, propped up on random jars, boxes, etc. on the garage floor. I used a smooth foam roller

True North Quilt

Image
It feels so nice to get projects done that have been weighing on my mind for a while. Here's the True North quilt for my friend's little girl! Last time I posted about this project, I was wondering what to do for the backing. It seemed totally appropriate to replicate the cute little HST chevrons on the back in a larger scale, using each of the fabrics from the front. I usually lean towards asymmetrical design, so I offset the large chevron, constructed out of 9" HST blocks, to line up with the second and third columns of blocks on the front.     I finished up the top stitching on the quilt on Thursday night, and while it's super random, I really like how it turned out. I also tried a new method of attaching the binding, which ended up saving me a good 10 minutes of screwing around. I normally pin the binding on and sew all the way around, leaving about 12 inches free on either end, so I can open them up, cut to the precise length an

Quilting with Friends

Image
One of my best friends recently became an uncle. He also mentioned briefly that he wanted to learn how to quilt! Sooooo.... obviously, I jumped on that combo and decided to help him create a quilt for his little niece Audrey for Christmas (we're starting early for good reason!). Audrey was named after the one and only Miss Hepburn, so naturally her room is in shades of pink and gold... although Tiffany blue would also be fantastic!   I recently started cutting up my fabric scraps into 2.5" squares... and I had just finished cutting the pink ones when Dan mentioned his desire to quilt something, so that seemed perfect. I designed a patchwork half square triangle block using the 2.5" squares and a larger half square triangle. I stopped at St. Vinny's to see if I could find any supplemental fabrics, and I lucked out again! I found two different gold fabrics and a couple pieces of pink print, as well as a nice big piece of light pink for the backing. I liked the id

Packers Football Quilt

Image
Here it is! The finished product...   It turned out so awesome! I just love it. I'm pretty confident I can say that Grandpa loves it too... To check out some of the process, check out my other posts about this project: Planning & Prepping and Three Quilts Become One .

Three Quilts Become One

Image
The Packers quilt is nearing completion! I finished the quilting on each of the three sections, alternating between green, yellow and brown for the spool thread (on the top of the quilt) and using green for the bobbin thread (on the backside). I love the textures that resulted in the different quilting patterns I used, which were all done with the walking foot. One of these days I'll try free motion- I swear!  Then came my next challenge- attaching them all together to make one large quilt. My mother-in-law walked me through the basics over breakfast, and I gathered the main plan of attack: attach the front faces together, leaving the backing of one piece out to fold over and hand-stitch down. I sewed the pieces together, doing just that.  You can't tell from the front, but here's what the backside seams looked like:  Preparing the pieces for this kind of assembly was a bit of a challenge for me. I normally just run my top-stitching right off

Scrappy Dappy Doo!

Image
Ok, so we all know how much I hate wasting stuff... and this leads to a HUGE accumulation of itty bitty scraps and random stuff hanging around my craft areas. As I've been binge-watching quilting tutorials on YouTube lately, I came across a little video on making a scrappy quilt out of leftover 2 x 3.5" rectangles all sewn together. I'm not a huge fan of the super traditional look of the example quilt, but it really got me thinking about the bags upon bags of scraps I've been collecting since I made that first baby quilt four years ago... So I dug them all out (I think I got all of them??), dragged them to the darkroom with me over the weekend (yay, dedicated crafty time!) and sorted through my heap of scraps. I started with putting them in piles by color, and removing the tiny pieces that wouldn't be useful.   It's amazing how much smaller the pile looks once the pieces are all sorted and folded up nicely.  I even found some super cute pro

Closet Update: more progress

Image
Ugh. This project is taking way longer than I wanted it to. But it's coming along, slowly but surely. I sanded the shelves and stained them this past weekend. I got to be the noisy neighbor (at least for a while... then the weirdo next door started tripping on something weird and was mumbling gibberish for a few hours... ?), with the combo of the old clunky air compressor and the orbital sander. I attempted to get them done as quickly as possible, so as not to be super annoying. I ended up only needing to run the 80 grit over the boards to get them smooth... I was expecting to need to go up to 220, but it seems to have done the trick. After all, the shelves are supposed to look industrial and reclaimed, so I'm not terribly concerned about a mirror-smooth finish. I then stained the shelves a nice ebony black. I used old balled up cotton socks to apply the stain, and wore big rubber cleaning gloves to keep the stain off of my fingers. They look beautiful! :) Next u