Posts

Showing posts from July, 2017

My Fair Tiny Quilts

Image
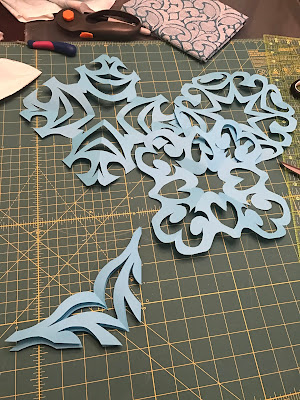
I spent the weekend working on my mini quilts for the fair, and they're turning out so cute! First up, I got the giant applique snowflake quilt ready to go. I cut the fabrics down to about 34" square. I had purchased a yard of each, so I have a bit left over of each one for binding and hang tabs. I then applied the fusible (with paper) to the backside of the white and silver fabric and folded it up like I was cutting a paper snowflake. And then I got stuck. I didn't want to just cut willy-nilly and end up with an ugly snowflake. I only had one shot to do it for real! So I practiced with some blue printer paper (and a paper scissors!). It's kind of hard to think about snowflakes in the middle of summer... I felt like I couldn't come up with anything creative! Once I landed on a design I liked, I folded the snowflake back up and drew the shapes onto the fusible backing. I should note here that I folded my fabric differently than Rob of Man Sewing did in his

Kaffe Fassett Jelly Roll Jam Quilt

Image
Here it is! I tried something new with this quilt, and I'm not sure I was 100% successful. The binding was unusual for me. I normally do the whole 2.5" strip, hand-sewn binding thing, but I wanted to try using the backing as the binding this time to keep it simple. I LOVE this backing fabric ; it's so soft, and it tied in so nicely with the color scheme of the Kaffe Fassett "Tides" jelly roll. I have noticed though, that this particular fabric shows a lot of poke holes, so be careful with pin placement and try to get your seams right the first time around. I worked really hard to turn my edges under nicely and pin well, at least every 2 inches. Unfortunately, as I kind of  suspected, some of the loose ends bulged out in between the pins as my presser foot went over them. Now that I've washed the quilt, I can see that I need to do some seam ripping to fix a lot of little peeks of batting and frayed edged. Sad face. I also noticed tha

Let's go to the Fair!

Image
I suddenly feel like a missed out on a huge part of childhood...  I've been researching home brew competitions for my husband to enter his concoctions into, and I found out that our county fair is hosting one this year. I also found out that you can submit just about ANYTHING to the fair and WIN RIBBONS! ha ha... my inner child is totally geeking out right now. I was always a super creative and crafty kid- why didn't anyone tell me this before!? Beyond sewing, crochet, painting, beading, photography, etc., there are also the obvious livestock judging things that everyone knows are part of the fair. One thing I'm bummed about is that the "dog" category- dog obedience and agility (something I've ALWAYS wanted to do with my dog) is only open to Juniors (AKA kids). Boo. I tried desperately to train my childhood Yorkie, Sniffer, how to jump and weave polls in our tiny basement when I was 9 years old... had I only known I could actually do it for real! Ha!

Donut look good?

Image
I just had to share this quick snippet with you all. :) Two guys I work with both got married this month (to women, not each other. Ha ha!), so we threw them a goofy "Groom Shower" last week. One of them is a Star Wars nerd, and the other apparently looks a lot like Nickelback's lead singer... thus the goofy Chad Kroger and Luke Skywalker cutouts on top. Cutting the cake! They refused to feed it to each other... I was tasked with making the cake. Both of these guys hate donuts for some reason, so naturally, we decided on a big white donut wedding cake. Ha ha. I ordered a cake pan from Amazon and got to work. The cakes and both types of frosting/glaze are all made from scratch, and the recipes came from the Betty Crocker cookbook- ours was printed in 1980. Ha! I chose the recipe for "Bonnie Butter Cake". Our copy has been around the block a few times. I ended up making two batches of cake batter. Each batch filled the donut pan half way

Closet Update: Installation and Reveal!

Image
Oh my gosh, it's finally done! For the most part... Installing this system was quite a bit more complicated than I had imagined. I thought maybe I could assemble the pieces laying down, then prop them up and secure them, but no. They pretty much have to be built from the bottom up. Hmm... nope. That doesn't work. We started by marking out the placement of the floor flanges. I measured about a dozen times and cross-referenced with my drawings, but I also laid the shelves out on the floor where they were supposed to be and made marks through the holes just to be sure everything lined up. Once we knew exactly where the flanges needed to be, we pre-drilled holes into the floor and secured them with #10 flat head wood screws, making sure they were all facing the same direction. We eventually loosened these so the shelves could move away from the wall a bit while we added stuff and attached the flanges at the top. We then started adding our risers and shelf supports,