Posts

Showing posts from 2016

Quick & Simple Personalized Art Display

Image
Do your kiddos make more art at school than your fridge can handle? My nephew Liam is apparently a super-duper prolific artist, and his mom needed somewhere to hang all his masterpieces. I whipped up this neat little board out of an eight-foot piece of lumber, a few screws, some magnetic clips, paint, stain, glue, and a set of decorative letters. First, I cut the eight-foot piece of 1x8" lumber in half to make two four-foot pieces. I attached them together from the back side with two smaller pieces of scrap wood and screws. Sorry... I don't have a picture of that. The lumber was pre-sanded and nice and smooth (I got it at Menards; it comes wrapped up in plastic to protect it from dings and scratches), so I just took it outside and stained it a nice chestnut brown. Once the stain was dry, I brought the board in and laid out the clips evenly... then stuck them down with Gorilla Glue. I also dabbed some enamel model paint into the circular indents in the clips, just for

Woodland Critters Quilt(s)

Image
Woodland animals must be a really popular nursery theme these days! I've actually done two cuddly critter baby quilts in a row now... Knot Hole Gang My mother-in-law and I worked on the first one together; it was for her niece's baby girl Beatrix (Bee for short), so we used her favorite technique, fused & pieced applique. Whew! I had never done anything quite like this before, and I think I'll leave these ones to Deb from now on. Too tedious for me! We used a cute pattern from a book called Critter Hollow that Debbie had purchased, which includes several patterns for cute little chubby applique animals hanging out in a tree ( Brandywine Design ). We decided to go with the pattern called "Knot Hole Gang" so we could work on pieces separately.   Debbie and I met at My Favorite Quilt Shop to pick out fabrics, and we ended up with some really cute ones in a relatively gender-neutral palette. A nice bright, grassy green for the background, some pretty

Adopt Me Vests: Part 2

Image
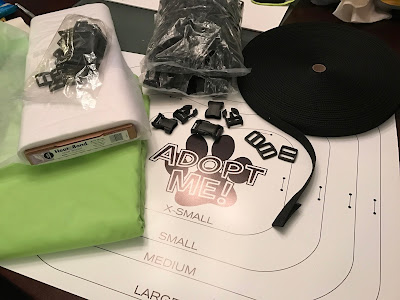
Holy cow has it been a busy past couple of weeks for me... I've been traveling for work quite a bit (which is unusual), so I got done what I could on these super cute doggy vests in between trips to Orlando and Dallas. Everything from Amazon.com arrived right away (yay, Prime!), which included the buckles, belting, and interfacing. I also picked up some cheap lime green fabric to make a sample so I could check my pattern. The fabric arrived a week or so later; all 12 yards of it! Four yards of turquoise, eight yards of lime green. I found the most efficient way to cut these out was to essentially cut four layers at once; a double thickness to get two vests, then another fold at the center of the vest. This ensures the vests are symmetrical, while also saving a ton of time and effort compared to cutting out the pieces individually. I had started out by tracing the patterns onto the fabric with a marker, but this seemed extra tedious. I ended up cutting the majority of th

Adopt Me Vests- my Fall Good Deed

Image
Several months ago, I joined the BAHS Pack Runners program, which allows me to go to the shelter, "check out" a pooch, and take him or her for a run. It's awesome! Not only does the exercise help me, but it lets the dog burn off some energy, reduce stress from being in the shelter environment, and helps him be well-behaved when he meets potential adopters. Tatelyn- AKA: Tater. ADOPTED! We seem to have a shortage of Adopt Me vests though... we like to have the dogs wear these when they're out and about to get exposure for the dog, the shelter, and the program. I decided that my skills could be put to good use by making a bunch of new vests! Nathan... FINALLY ADOPTED! I designed a pattern based on this tutorial , but decided to change up the construction quite a bit. I basically just followed the basic vest measurements listed here, making a large, medium, small and extra-small sized pattern. Check! Then I did a quick layout in Illustrator to see ho

The Five Minute Wreath- Halloween

Image
Oh, Martha Stewart... or I guess Martha's Minions who craft for her magazine... you always come up with stuff that is so simply obvious, but clearly not obvious enough for me to invent on my own... and then leave me kicking myself for not thinking of it first! Take this cool black Halloween door decoration featuring slithering snakes on a grapevine wreath, for example. I'm actually kind of surprised there's a tutorial for this, it's so simple! Anyways... I loved it, so I decided to make my own. I ordered a bunch of rubber snakes on Amazon.com: a 12-pack of 36" snakes and a baggie of little 6" buggers. The grapevine wreath was from Michael's. And this is all I needed... So, basically, all I did was weave the snakes in and out of the grapevines, starting with the big ones. They were more coiled than I expected, so they fought with me a little while I was trying to stretch them out, but they keep their shape nicely once they were adjusted. I gravi

Crafting with the Kiddos

Image
I can't believe I forgot to post about this! This past Easter (umm... 6 months ago?), I brought a really fun and simple craft project along to our family gathering to do with my niece and nephews... bunny paintings! I bought a four-pack of 8x10 canvases at a craft store and pulled out some craft paint I'd had hanging around for a while. I painted each of the canvases a nice pastel background color; pink, green, blue and yellow. Then, I stuck some removable bunny-shaped stickers that I printed out at work to the center of the canvases and they were ready to go. Jackson got to pick his canvas first, since he's the oldest (and likely had the only opinion of the three), and he chose the blue one. I also had him pick a few paint colors and squeezed a bit onto a paper plate for him. I had cut up a few dish sponges to make paint dabbers, and he got to work painting away! Jackson picks his paint colors. It was kind of funny how terrified he was of getting dir