Woodland Critters Quilt(s)
Woodland animals must be a really popular nursery theme these days! I've actually done two cuddly critter baby quilts in a row now...
Knot Hole Gang
My mother-in-law and I worked on the first one together; it was for her niece's baby girl Beatrix (Bee for short), so we used her favorite technique, fused & pieced applique. Whew! I had never done anything quite like this before, and I think I'll leave these ones to Deb from now on. Too tedious for me!
We used a cute pattern from a book called Critter Hollow that Debbie had purchased, which includes several patterns for cute little chubby applique animals hanging out in a tree (Brandywine Design). We decided to go with the pattern called "Knot Hole Gang" so we could work on pieces separately.

Debbie and I met at My Favorite Quilt Shop to pick out fabrics, and we ended up with some really cute ones in a relatively gender-neutral palette. A nice bright, grassy green for the background, some pretty mossy stripes for the border, wood grain for the back, and beige for the circles. Deb's extensive stash of colorful batik scraps was plenty to piece together all the little critters...

I worked on cutting out and applying several of the animals to the background fabric, including the brightly colored butterflies, birds and flowers that added cute pops of color. Debbie did the satin stitching around all the pieces (yikes... this is one time I'm glad my sewing machine was malfunctioning!), and I finished the sandwich with quilting around each of the circles and the border.
This puppy was done in record time too... two weeks flat! Yay, teamwork! Plus I got to meet the church quilting group... ha ha. Boy do I wish I could quilt all day like those ladies. Dream on, girlfriend!


Unfortunately, I don't have a picture of the finished quilt, as my hubby and I were leaving for Bonaire the day of the shower, and his mom put the binding on to finish it up in the car on the way there. Talk about the nick of time... but I think ours turned out way cuter than the original pattern. The bright pops of color make it!

Retro-Mod Owls
Sometimes it's nice to get back to basics and piece some nice square blocks.
I have another little relative due in February... what do I call my cousin's baby? A boy this time. Their shower is the day after Christmas, and of course I got a late start on my quilt again.
I always like to try to make my baby quilts match the theme that the parents are going for in their little one's nursery, and I'm glad that I got inside info on the theme from my aunt. I also checked out their gift registry on ToysRUs.com. They registered for a simple block quilt set, but I knew I could do better. I did appreciate the simplicity of their choice though, with my tight timeline and all, so I decided to keep the squares in my final design, with just a few fun touches.

I could have bought several of the exact same fabrics that were in the registry quilt on fabric.com, but a little birdie told me that mama-to-be has a thing for owls. So I picked out a cute owl print and matched several other prints that resembled other items in the registry (the birch tree wall decals, for example). There was also a cute fox pillow on their list, so I brought in a bit of orange and red to tie in a pieced "fancy fox" pillow as well, and to match some of the tiny details in the owls and little woodpeckers on the birch tree print.

My good friend Illustrator helped me out again with figuring out how I wanted to put this thing together. I had a basic idea of the patterns and colors of the fabrics I had chosen online, so I made representations of them in 9" blocks and just played around with a layout until I liked what I saw. The big red square in the middle wasn't originally there; it was white (with blue and green leaves) before but I didn't like that there would be a huge chunk of white right smack dab in the middle, being next to an owl print that was already sided up by two white pieces. And NOTHING I did seemed to help. So... I added a big ol' focal spot in bright red. :) It actually tied in nicely with the placement of the other orange and red pieces too, so I'm a happy camper.

Once I got my fabric in the mail, I couldn't wait to get started. This was my first time ordering fabric online... I was a tad nervous that I'd completely screw it up, and there was a point after I cut out the blocks that I was all "oh my gosh, this looks ridiculous!". They seemed so pastel compared to what I had laid out on the computer, and I wasn't feeling the lack of contrast. But once the pieces were all sewn together, it just kept growing on me and I absolutely love it.
One bonus of ordering online- they're really generous with their cuts! They sent me an extra eight inches of my birch tree print, and thank goodness they did, because I wouldn't have had enough...
I started by piecing together the "minor" blocks, the 9" blocks made up of smaller ones.

Then I sewed together the tall "major" blocks that take up the space of two or more 9" blocks.
Since the major blocks were all vertical, I decided to piece the quilt in vertical strips instead of going left to right like I normally do (what is normal? lol). It actually worked up really quickly, and in no time I zipped up the four long seams and had a completed top!


So I have this neat little presser foot for my Husqvarna with a little metal guide along the side, and it makes it super simple to get a precise 1/4" seam allowance when piecing. This is SUPER important if you want your corners to line up and your quilt to be square... and who doesn't? I noticed a little too late that it's only exactly 1/4" IF you line up your needle with the little red mark. Oops. All my squares are about 1/16" too small. Ha ha, oh well. The important thing is that I didn't change it when I realized what was happening. If I had, everything would have been off slightly... resulting in more than a half inch of wonkyness!
I was even able to sandwich the quilt with a backing of super soft birch tree print all before dinner last night. I did have to make a Franken-batting though... my seven 9" blocks made the quilt a bit longer than a traditional crib quilt at 63", and the batting was only 45"x60". Fortunately there was about 3" hanging out one side, so I trimmed it off and zig-zagged it to the bottom. No one will ever know... ;)
Cut-to-sandwich, this cute little thing came together within a window of about five hours. It's amazing what I can accomplish on a deadline!
Now I just have to decide how I'm going to top stitch this thing... I'm leaning towards quilting from the back to emphasize the texture of the birch trees, but I'm worried that will look weird on the front unless I pick just the right bobbin thread color... decisions, decisions!
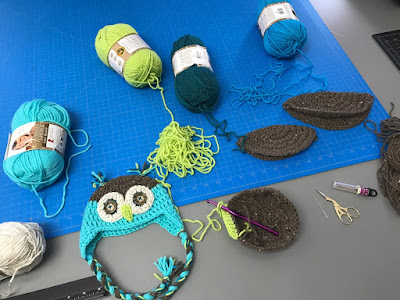
Bonus Owl Hats
Of course, no owl lover should be denied owl hats for their baby! I made one for each stage of growth; newborn, 3-6 months, and 6-9 months. :)

Pee pee tee pees are on the docket next, after the little fox pillow. Then back to the doggy vests!
Ha ha... #projecthopper
Knot Hole Gang
My mother-in-law and I worked on the first one together; it was for her niece's baby girl Beatrix (Bee for short), so we used her favorite technique, fused & pieced applique. Whew! I had never done anything quite like this before, and I think I'll leave these ones to Deb from now on. Too tedious for me!
We used a cute pattern from a book called Critter Hollow that Debbie had purchased, which includes several patterns for cute little chubby applique animals hanging out in a tree (Brandywine Design). We decided to go with the pattern called "Knot Hole Gang" so we could work on pieces separately.


I worked on cutting out and applying several of the animals to the background fabric, including the brightly colored butterflies, birds and flowers that added cute pops of color. Debbie did the satin stitching around all the pieces (yikes... this is one time I'm glad my sewing machine was malfunctioning!), and I finished the sandwich with quilting around each of the circles and the border.
This puppy was done in record time too... two weeks flat! Yay, teamwork! Plus I got to meet the church quilting group... ha ha. Boy do I wish I could quilt all day like those ladies. Dream on, girlfriend!


Unfortunately, I don't have a picture of the finished quilt, as my hubby and I were leaving for Bonaire the day of the shower, and his mom put the binding on to finish it up in the car on the way there. Talk about the nick of time... but I think ours turned out way cuter than the original pattern. The bright pops of color make it!

Retro-Mod Owls
Sometimes it's nice to get back to basics and piece some nice square blocks.
I have another little relative due in February... what do I call my cousin's baby? A boy this time. Their shower is the day after Christmas, and of course I got a late start on my quilt again.
I always like to try to make my baby quilts match the theme that the parents are going for in their little one's nursery, and I'm glad that I got inside info on the theme from my aunt. I also checked out their gift registry on ToysRUs.com. They registered for a simple block quilt set, but I knew I could do better. I did appreciate the simplicity of their choice though, with my tight timeline and all, so I decided to keep the squares in my final design, with just a few fun touches.

 |
| The Peanut Shell's fox pillow (sold out...) |
 |
| Elizabeth Hartman's Fancy Fox block... let's do this instead! |

My good friend Illustrator helped me out again with figuring out how I wanted to put this thing together. I had a basic idea of the patterns and colors of the fabrics I had chosen online, so I made representations of them in 9" blocks and just played around with a layout until I liked what I saw. The big red square in the middle wasn't originally there; it was white (with blue and green leaves) before but I didn't like that there would be a huge chunk of white right smack dab in the middle, being next to an owl print that was already sided up by two white pieces. And NOTHING I did seemed to help. So... I added a big ol' focal spot in bright red. :) It actually tied in nicely with the placement of the other orange and red pieces too, so I'm a happy camper.

Once I got my fabric in the mail, I couldn't wait to get started. This was my first time ordering fabric online... I was a tad nervous that I'd completely screw it up, and there was a point after I cut out the blocks that I was all "oh my gosh, this looks ridiculous!". They seemed so pastel compared to what I had laid out on the computer, and I wasn't feeling the lack of contrast. But once the pieces were all sewn together, it just kept growing on me and I absolutely love it.
 |
| Darkroom turned quilting room. :) Alumni perks. |
 |
| The prints started reading really retro once together... |
One bonus of ordering online- they're really generous with their cuts! They sent me an extra eight inches of my birch tree print, and thank goodness they did, because I wouldn't have had enough...
 |
| 36" was the 2-yard mark... thanks Fabric.com! :) |
I started by piecing together the "minor" blocks, the 9" blocks made up of smaller ones.

Then I sewed together the tall "major" blocks that take up the space of two or more 9" blocks.
 |
| Back home to my "formal crafting room"... |


So I have this neat little presser foot for my Husqvarna with a little metal guide along the side, and it makes it super simple to get a precise 1/4" seam allowance when piecing. This is SUPER important if you want your corners to line up and your quilt to be square... and who doesn't? I noticed a little too late that it's only exactly 1/4" IF you line up your needle with the little red mark. Oops. All my squares are about 1/16" too small. Ha ha, oh well. The important thing is that I didn't change it when I realized what was happening. If I had, everything would have been off slightly... resulting in more than a half inch of wonkyness!
 |
| Yup. That's not lined up. |
 |
| Nice! This is my WORST corner. It's practically microscopic. ha ha. :) |
 |
| Ready to quilt.... once I make up my mind. |
Now I just have to decide how I'm going to top stitch this thing... I'm leaning towards quilting from the back to emphasize the texture of the birch trees, but I'm worried that will look weird on the front unless I pick just the right bobbin thread color... decisions, decisions!
Bonus Owl Hats
Of course, no owl lover should be denied owl hats for their baby! I made one for each stage of growth; newborn, 3-6 months, and 6-9 months. :)


Pee pee tee pees are on the docket next, after the little fox pillow. Then back to the doggy vests!
Ha ha... #projecthopper

Comments
Post a Comment