Wedding Rings to Flower Power
Remember those beautiful antique wedding ring pieces I brought home last June? Yeah, I barely did either until I went through the heaps of UFOs in my craft room (I'm working on simplifying and finishing stuff... but it's not really going so great yet).

Anyways, this quilt came together really quickly -until something new and shiny came along- and I just recently finished up the last bit of top stitching and binding.
But let's go back to the beginning...
I loved the vintage-y 1970's-vibe I was seeing in all the little prints, so I used the colors in the designs as my jumping off point. The orange and purple stood out most to me, in addition to yellow and teal.
In keeping with the theme of old to new, I headed to my local St. Vinny's and picked out a bunch of solids that grabbed my attention. All in all, I spent about $14 on about 7 yards of fabric, give or take; some of them were irregularly sized. Par for the course in used craft supplies.

The orange and the purple looked awesome together, and really highlighted the piecing of the wedding ring blocks. I decided to use those as my quilt top and save the remaining fabrics for a backing.

I love asymmetry, so I made the quilt top one third(ish) orange and two thirds(ish) purple, then overlaid the wedding ring blocks on the seam. I had started off wanting to keep the integrity of the original wedding ring shapes, but the more I looked at it, the less right it felt. So I ended up carefully separating a few of the ellipses and re-configuring them into flower petal shapes.


To applique the pieces down, I cut some football-shaped fusible and pressed them onto the quilt top. I then used a small blanket stitch on my machine to carefully trace the turned edges of the pieces. Once the appliques were in place, I went around and pulled out the original basting stitches with my seam ripper.


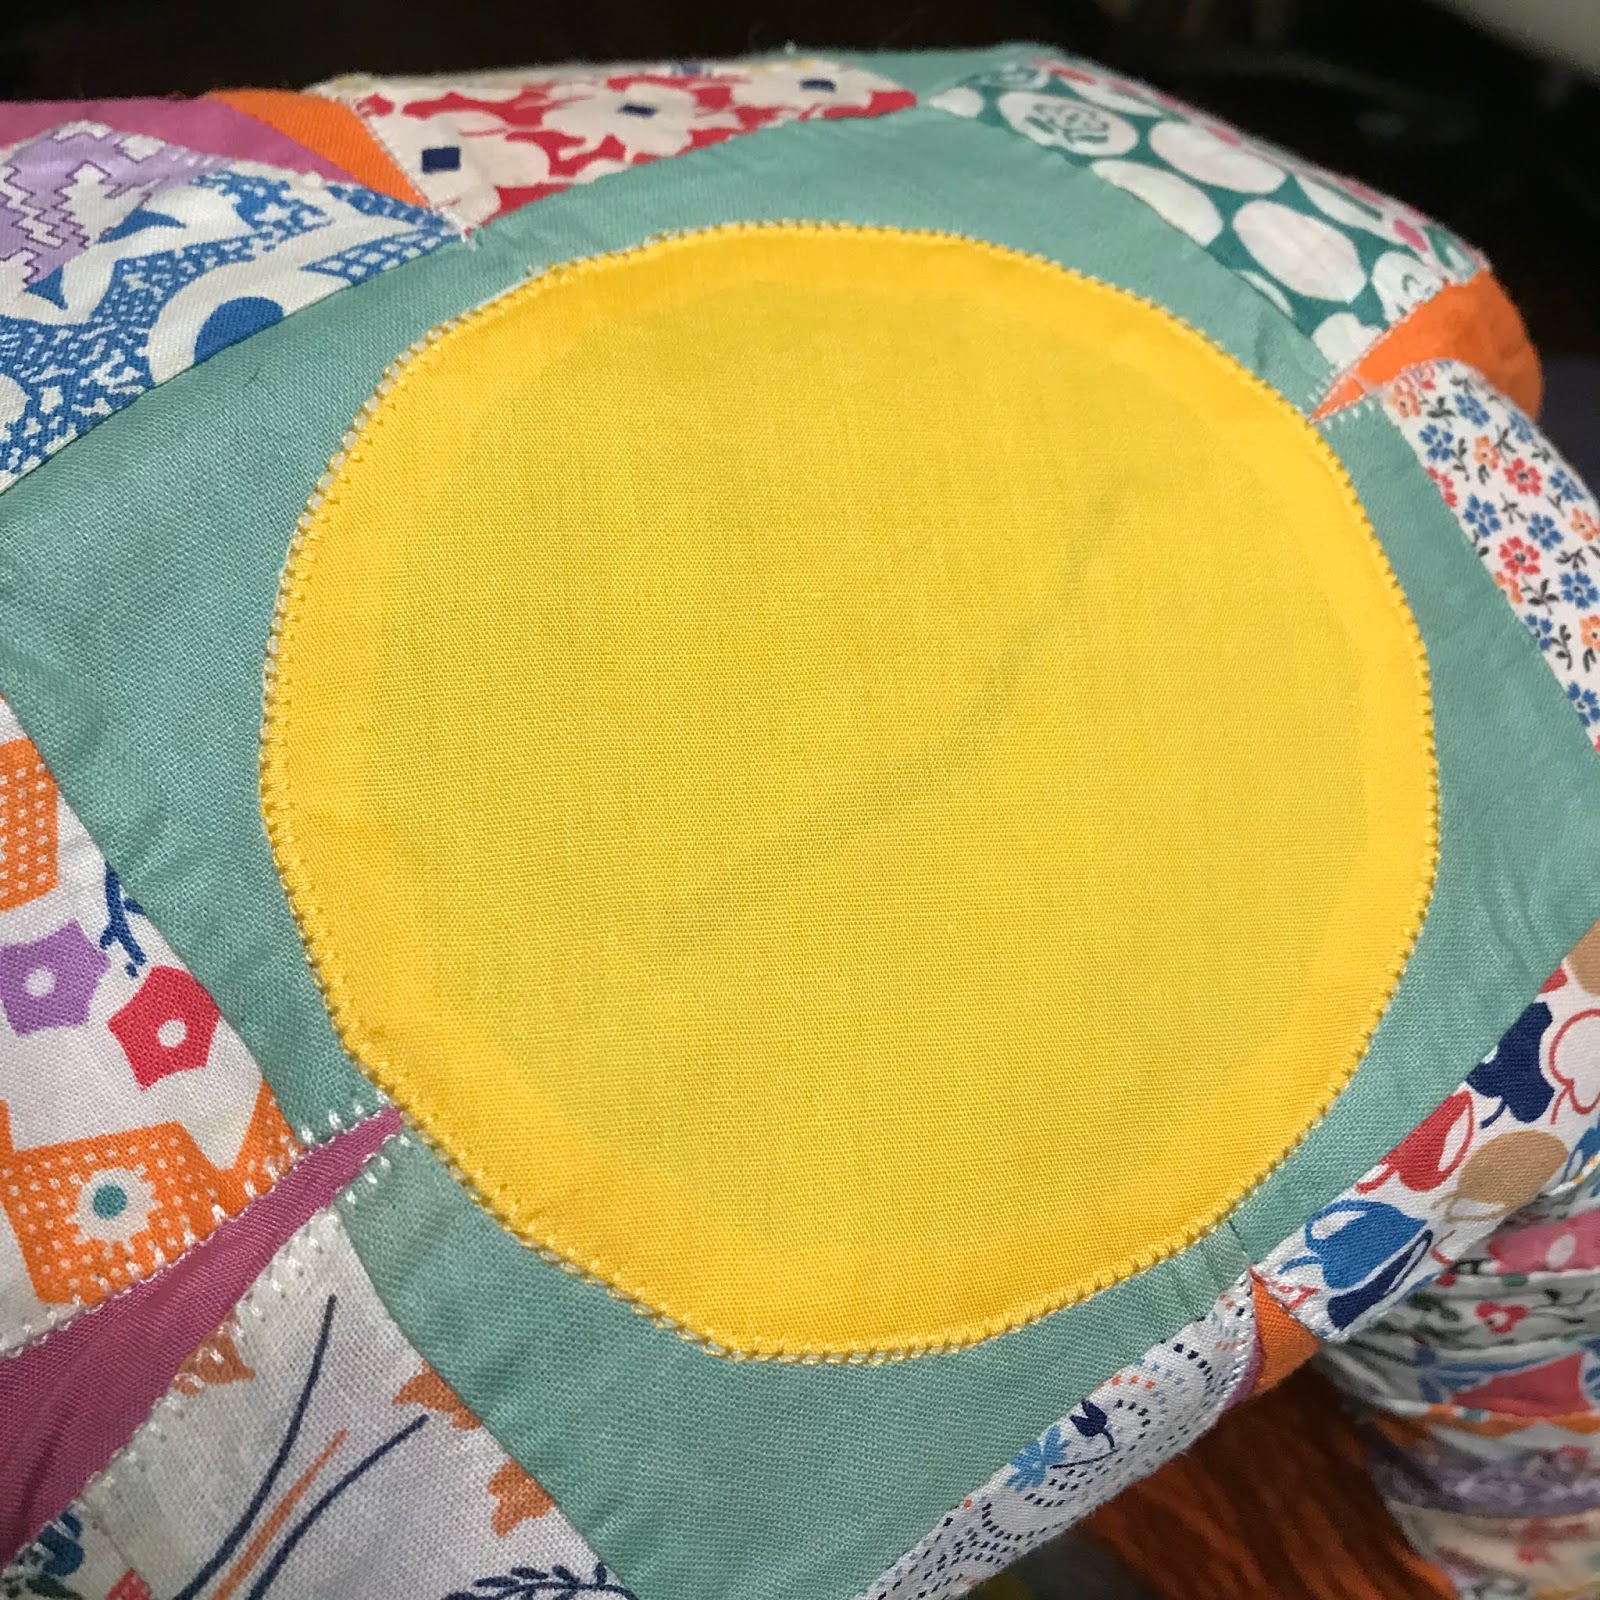
The shapes didn't butt up next to each other how I wanted them to- there were some irregular gaps that I didn't like- so I decided to take the "flower power" theme a bit further and applique some yellow circles onto the centers.

I didn't want raw-edge applique mixed with the nice finished turned edges of the ellipse shapes, so I used a method I saw... somewhere. I can't for the life of me find the YouTube tutorial- sorry! I cut circles of yellow fabric and fusible interfacing and sewed one of each together, with the fusible side facing the fabric. I then cut a small slit in the center of the fusible layer, clipped around the edges and turned the circle right side out. I pressed the circles onto the quilt top and finished them with the same small blanket stitches. The only thing I don't love about this method (at least with this semi-transparent yellow fabric) is that the slit and the extra layer of fabric around the edge shows through.

I used long, wide strips of my leftover thrifted fabric to construct the backing. Apparently I forgot to take pictures of any of this process, so below is a picture of the backing partially quilted. I think it kind of looks like a sunset over the ocean or something. I dig it.

On the topic of quilting, I really wanted to emphasize the antique pieces and draw the eye towards the focal point. I just echoed around the petal shapes about a half inch apart for a good while, then gradually spaced the lines of stitching farther apart as I radiated outwards. All of the quilting was done with a walking foot on my Husqvarna Designer Topaz.

I think bindings are generally underappreciated. I love to give my quilt bindings some personality and pizzazz. To bring a little bit more teal into the front composition of the quilt, since the only teal is on the cornerstones of the piecing, I chose to bind the orange part in teal and the purple part in orange. I measured the perimeter of the orange and purple areas, and made strips of binding accordingly.

To make the color change happen right on the seam between the colors, I pinned the binding seam at the quilt top seam and pinned well all the way around, making sure to miter the corners as I pinned. I left the gap near the seam on the other side to connect them precisely after it was sewn on.


This quilt turned out so cute! It ended up measuring about 48" square, which was mainly influenced by the size of the original quilt pieces. I chose to make it square because I feel it's cool and modern, yet it also made me think of the 70's again: don't be a square, man! Or wait... is it hip to be square?


It's not the most inventive quilt top ever, but I think it honors the vintage quilt blocks nicely and gives them a modern twist. What a fun way to incorporate abandoned quilt blocks! I come across them from time to time in the thrift stores... who wants to start collecting?!? :)

But let's go back to the beginning...
I loved the vintage-y 1970's-vibe I was seeing in all the little prints, so I used the colors in the designs as my jumping off point. The orange and purple stood out most to me, in addition to yellow and teal.
 |
| Look at that tiny hand-stitching! |

The orange and the purple looked awesome together, and really highlighted the piecing of the wedding ring blocks. I decided to use those as my quilt top and save the remaining fabrics for a backing.

I love asymmetry, so I made the quilt top one third(ish) orange and two thirds(ish) purple, then overlaid the wedding ring blocks on the seam. I had started off wanting to keep the integrity of the original wedding ring shapes, but the more I looked at it, the less right it felt. So I ended up carefully separating a few of the ellipses and re-configuring them into flower petal shapes.


To applique the pieces down, I cut some football-shaped fusible and pressed them onto the quilt top. I then used a small blanket stitch on my machine to carefully trace the turned edges of the pieces. Once the appliques were in place, I went around and pulled out the original basting stitches with my seam ripper.


The shapes didn't butt up next to each other how I wanted them to- there were some irregular gaps that I didn't like- so I decided to take the "flower power" theme a bit further and applique some yellow circles onto the centers.

I didn't want raw-edge applique mixed with the nice finished turned edges of the ellipse shapes, so I used a method I saw... somewhere. I can't for the life of me find the YouTube tutorial- sorry! I cut circles of yellow fabric and fusible interfacing and sewed one of each together, with the fusible side facing the fabric. I then cut a small slit in the center of the fusible layer, clipped around the edges and turned the circle right side out. I pressed the circles onto the quilt top and finished them with the same small blanket stitches. The only thing I don't love about this method (at least with this semi-transparent yellow fabric) is that the slit and the extra layer of fabric around the edge shows through.
I used long, wide strips of my leftover thrifted fabric to construct the backing. Apparently I forgot to take pictures of any of this process, so below is a picture of the backing partially quilted. I think it kind of looks like a sunset over the ocean or something. I dig it.

On the topic of quilting, I really wanted to emphasize the antique pieces and draw the eye towards the focal point. I just echoed around the petal shapes about a half inch apart for a good while, then gradually spaced the lines of stitching farther apart as I radiated outwards. All of the quilting was done with a walking foot on my Husqvarna Designer Topaz.

I think bindings are generally underappreciated. I love to give my quilt bindings some personality and pizzazz. To bring a little bit more teal into the front composition of the quilt, since the only teal is on the cornerstones of the piecing, I chose to bind the orange part in teal and the purple part in orange. I measured the perimeter of the orange and purple areas, and made strips of binding accordingly.

To make the color change happen right on the seam between the colors, I pinned the binding seam at the quilt top seam and pinned well all the way around, making sure to miter the corners as I pinned. I left the gap near the seam on the other side to connect them precisely after it was sewn on.


It's not the most inventive quilt top ever, but I think it honors the vintage quilt blocks nicely and gives them a modern twist. What a fun way to incorporate abandoned quilt blocks! I come across them from time to time in the thrift stores... who wants to start collecting?!? :)

Whitney - it is wonderful❣️ You turned those few old, unfinished pieces into a work of art. So inspiring. I know Mary W. Kerr - creator of the "Twisted - Modern Quilts with a Vintage Twist" will want to see your blog, which is so full of pictures and details. Thank you!
ReplyDelete:) Thank you! I really love how it turned out!
Delete