Harambee! Let's quilt together!
Hey everyone! It's really been a while since I've posted anything here... life has been CRAZY!
I'm popping in today to share a little picture tutorial for a quilt along project I've been asked to orchestrate for the First Quilters. Every two years, our friends at KenyaHELP (the organization we made the market bags for) have a fundraiser called Harambee Night to raise money for their mission work in Kenya. Harambee is a Swahili word that means "all pull together", and is traditionally associated with events meant to benefit or help individuals and communities. In fact, "harambee" is Kenya's motto, and it appears on the national coat of arms.
I have designed a beautiful, intricate-looking, African-inspired quilt block that is also very easy to assemble, and I am in the process of pre-cutting batik pieces to make kits for the 25 blocks we need to make a queen-sized quilt (and maybe a couple extra for matching throw pillows). The ladies of the First Quilters will be picking up kits on April 1 and hopefully returning them completed by June- leaving me plenty of time to assemble and finish the quilt before the Harambee Event in September, where it will be auctioned off to raise money.
I've created a simple instructional booklet to go along with each pre-cut block kit, but I wanted to add some photos here for clarity.
I selected a variety of bright, fun batiks for this project. Batiks work great for quilt-alongs like this for a few reasons... first off, they're generally made from tighter-woven fabrics, which means they don't fray. Basically, they travel well! They're also double-sided, so we don't really need to worry about fronts and backs. Sometimes the colors or patterns are more vibrant on one side or the other, and that's part of the fun! Whichever side YOU think looks prettier is the front! Finally, I think the handmade, rustic look of batik fabrics will really enhance the theme of this quilt in particular. I purposely chose prints that made me think of African animals and the jungle, like the zebra stripe and the big green leaves.
Let's get to the pattern...
Each kit contains the pieces to make one 15.5" quilt block.
We begin by sewing the shorter gold and red strips to opposite sides of each brown square, keeping the golds and reds together. As per usual in quilting, we want to be sure to use a 1/4" seam. Press the seams toward the strips.
Add the longer gold and red strips to the long edges, swapping color sets this time. These outer strips designate the blocks as "red" and "gold".
Press the "red" block, trim to 9.5" square and set aside.
Attach the shorter green strips to the "gold" block, along the red edges as shown.
Then, sew the longer green strips to the remaining edges, press, and trim to 13.5" square.
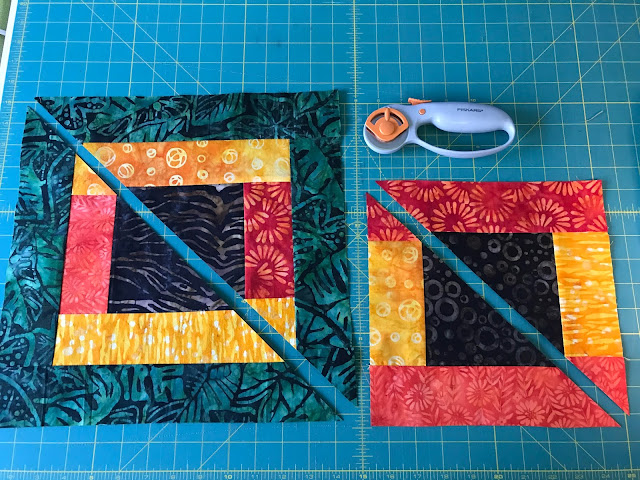
Cut each block diagonally down the middle as shown. Make sure the longer outer strips are on the top and bottom when you cut- this will ensure consistent pinwheel corners in the secondary pattern when the quilt is assembled.
Reassemble the triangles into one large block, with the right corners facing towards the center. Place the triangles so that each color strip makes a straight line across the block as shown, as opposed to being next to each other.
Sew the triangles together, lining up the 90 degree corners.


WOW! Beautiful fabric and block! The tutorial is wonderful - complete details from beginning to end.
ReplyDelete
ReplyDeleteWow, amazing block structure! How long
Have you written a blog before? Working on a blog seems easy.
The overview of your website is pretty good, not to mention what it does.
MAGIX ACID Pro Crack
QuarkXPress Crack
MTenorshare iCareFone Crack
SmartDraw Crack
VMware Workstation Pro Crack
Acronis True Image Crack
Glary Utilities Pro Crack