Game Day Ottoman Tray- UPCYCLE!
I was wandering my local ReStore one day and came across a huge pile of beautiful unused cabinet doors. The idea immediately struck me that the shallow indent in the middle would make a great place for a resin inlay of some sort, and eventually the idea formed in my head to make serving trays with a sports theme!

This idea came at a really great time, too. I was hosting a little craft get-together with some friends a few days later, and the theme was, of course, the Packers! I had gotten beads to make jewelry, flowers to glue on flip flops, cut up some t-shirts for loop scarves and got white tees for tie dye... needless to say, we only got through a couple crafts- the food was good and the company was great, so we spent most of our time gabbing, drinking and eating.
I purchased a total of 6 cabinet doors in different shapes and colors. I also picked up Packers bumper stickers and auto emblems, glitter tape and loose glitter, rhinestones, spray paint, drawer handles (for carrying the trays), cut-out stencils and a bunch of other goodies to encase in resin inside our trays.

We didn't get too far. This is the pile of trays today, where they still reside unfinished. We're planning another craft party soon.

Gina got the farthest on hers. Actually, she declared it done when she left my house. I took the liberty of bedazzling it up a bit before finishing it with the resin...
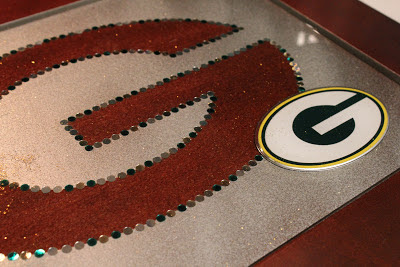
The tray started out as a stenciled G in silver spray paint with a cut-down bumper sticker on one side. I added a car emblem and some rhinestones around the G stencil... which in hindsight probably wasn't the best idea. It didn't occur to me that most rhinestones (the crystal ones, anyways) get their color from the foil backing behind them and are really just clear faceted glass. Pouring clear resin over them fills in the facets, making them... well... not rhinestones anymore. But it did look really cool before I filled it!


I then filled the indent with 12 ounces of mixed two-part clear epoxy resin. I figured the amount of resin with some good old-fashioned geometry. I hated math in school... but who knew I'd use it for something fun some day! I measured the length and width of the indent, and estimated that I'd need an eighth of an inch of depth to cover the objects inside. The volume of a rectangular prism is calculated by width X depth X height, so my three measurements multiplied together gave me inches cubed, or volume. Convert cubed inches to ounces, and there you go!
Unfortunately, my house is pretty old and we don't really have any level surfaces, so when I placed the tray with the liquid resin in the basement to dry, some funky stuff happened. Lucky I'm crafty, and I was able to shave down the high spots with a knife and prep it for a second layer of resin. Good thing I started with an eighth of an inch! The indent is actually a quarter inch deep, so I had some wiggle room.
Notice how the rhinestones lost their sparkle with the resin over them...
For the second layer, I thought the design needed a little something more... GLITTER! Around here, we call it glirpies because once you get it, you can't get rid of it! Glitter everywhere... even on the dog.
Anyways, I drew a line with plain old white Elmer's glue along the edge of the bumper sticker, then dragged a piece of paper with a wavy edge over the glue to create a drip effect. I then sprinkled the glitter onto the glue, waited a bit, and tapped off the extra. Basic glitter procedure.

Of course, it's impossible to get rid of all the extra glitter, so I sprinkled a bit all over the surface to add some sparkle to the second layer of resin. Once the Elmer's glue dried, I mixed up another 12 ounces and poured it on. This time, I used a level app on my iPhone to make sure the tray was resting at 180 degrees... no opportunity for weird drips or high spots! The best practice is to place something above the resin as it dries, but last time I tried that, my Rubbermaid lid got stuck to my project... so I'm just going to risk it this time. My kitchen isn't THAT dirty... ha ha.

Once the resin dried, the last step was to add the handles. Measure, drill holes, insert bolts, tighten. Basic handle-installing procedure.
Ta da! Now I'm ready to serve up some great snacks at my next football party... or rather, Gina is! Go team!

This idea came at a really great time, too. I was hosting a little craft get-together with some friends a few days later, and the theme was, of course, the Packers! I had gotten beads to make jewelry, flowers to glue on flip flops, cut up some t-shirts for loop scarves and got white tees for tie dye... needless to say, we only got through a couple crafts- the food was good and the company was great, so we spent most of our time gabbing, drinking and eating.
I purchased a total of 6 cabinet doors in different shapes and colors. I also picked up Packers bumper stickers and auto emblems, glitter tape and loose glitter, rhinestones, spray paint, drawer handles (for carrying the trays), cut-out stencils and a bunch of other goodies to encase in resin inside our trays.

We didn't get too far. This is the pile of trays today, where they still reside unfinished. We're planning another craft party soon.

Gina got the farthest on hers. Actually, she declared it done when she left my house. I took the liberty of bedazzling it up a bit before finishing it with the resin...
The tray started out as a stenciled G in silver spray paint with a cut-down bumper sticker on one side. I added a car emblem and some rhinestones around the G stencil... which in hindsight probably wasn't the best idea. It didn't occur to me that most rhinestones (the crystal ones, anyways) get their color from the foil backing behind them and are really just clear faceted glass. Pouring clear resin over them fills in the facets, making them... well... not rhinestones anymore. But it did look really cool before I filled it!


I then filled the indent with 12 ounces of mixed two-part clear epoxy resin. I figured the amount of resin with some good old-fashioned geometry. I hated math in school... but who knew I'd use it for something fun some day! I measured the length and width of the indent, and estimated that I'd need an eighth of an inch of depth to cover the objects inside. The volume of a rectangular prism is calculated by width X depth X height, so my three measurements multiplied together gave me inches cubed, or volume. Convert cubed inches to ounces, and there you go!
Unfortunately, my house is pretty old and we don't really have any level surfaces, so when I placed the tray with the liquid resin in the basement to dry, some funky stuff happened. Lucky I'm crafty, and I was able to shave down the high spots with a knife and prep it for a second layer of resin. Good thing I started with an eighth of an inch! The indent is actually a quarter inch deep, so I had some wiggle room.
Notice how the rhinestones lost their sparkle with the resin over them...

For the second layer, I thought the design needed a little something more... GLITTER! Around here, we call it glirpies because once you get it, you can't get rid of it! Glitter everywhere... even on the dog.
Anyways, I drew a line with plain old white Elmer's glue along the edge of the bumper sticker, then dragged a piece of paper with a wavy edge over the glue to create a drip effect. I then sprinkled the glitter onto the glue, waited a bit, and tapped off the extra. Basic glitter procedure.

Of course, it's impossible to get rid of all the extra glitter, so I sprinkled a bit all over the surface to add some sparkle to the second layer of resin. Once the Elmer's glue dried, I mixed up another 12 ounces and poured it on. This time, I used a level app on my iPhone to make sure the tray was resting at 180 degrees... no opportunity for weird drips or high spots! The best practice is to place something above the resin as it dries, but last time I tried that, my Rubbermaid lid got stuck to my project... so I'm just going to risk it this time. My kitchen isn't THAT dirty... ha ha.

Once the resin dried, the last step was to add the handles. Measure, drill holes, insert bolts, tighten. Basic handle-installing procedure.
Ta da! Now I'm ready to serve up some great snacks at my next football party... or rather, Gina is! Go team!

Comments
Post a Comment