I'm starting to feel like the odd one out. Not that that's a bad thing... but I'm losing all my carefree, fun-having friends to the world of parenthood!
This time, it's one of my college buddies who got married last year. I was her wedding photographer, and she texted me earlier this summer asking how I felt about doing maternity photos (!). Of course, I'll try anything once... but no guarantees!
The more important question I had was... boy or girl? I needed to get working on a baby gift! She and her husband hosted a cute little reveal party at their new house a few months ago, and the guests got to surprise the couple with the gender of the baby by attacking them with secret-colored silly string. It was pink!
 |
| Notice the blue paper tie... she thought it was a boy! |
Of course, pink equals princess in this family (their wedding cake topper was Cinderella and Superman disguised as Prince Charming), so I already had a great theme to work with.
What I had very little to work with was money. Fortunately, I was able to scrounge up enough cute pink and grey fabric around my craft room to only need a yard or so from the store! I purchased two different pink fabrics, a small roll of batting, and a few spools of thread for $14. Cheapest baby quilt ever! Score. It's kind of fun too knowing that one of the fabrics I used- a soft, pink matte satin- was used as a backdrop for mommy's bridal accessory photos.
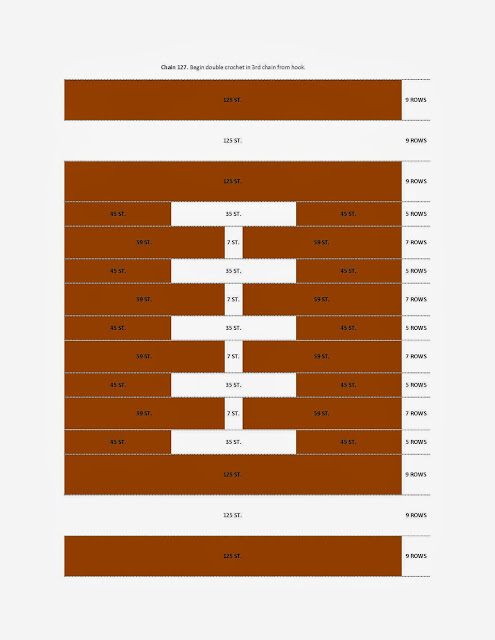
I came up with a couple design idea options (thanks, Pinterest!) for a quilt fit for a princess, and narrowed it down to two. One was a simple basket weave 9" square pattern, and the other was a transparency-style 12" quilt block turned on point. I think the 12" block would have turned out really cute and "princessy", but I had a hard time finding 5 shades of pink that matched and looked like they flowed together, so I went with the basket weave instead.
The blocks worked up really quickly. I essentially just cut strips of the fabrics from salvage to salvage and sewed them together, then cut the 9" blocks from those pieces. I finished the 30 blocks in an hour or so, then sewed them all together to make the quilt top (I took vacation the day after my half marathon... so I quilted all day). The sandwich was made, and I think I started the top stitching yet that night... I don't quite remember- it all happened so fast!
 |
| Cut fabric into strips... |
 |
| Sew strips together... |
 |
| Cut into squares. |
 |
| Sew and press seams open. |
 |
| Quilt sandwich. |
I also had a couple blocks left over and some scraps from the ends of the long strips, so I whipped up a front and some handles for a tote bag. I made the rest of the pieces for the bag out of scraps and top stitched all of those too. Side note: Bags are so simple! Why don't I make more of these and sell them?!?
 |
| Love how this top stitching gives the fabric so much texture! |
 |
| Tote bag parts... |
 |
| Super simple method of making a square tote. |
And here are the finished products! Notice I "branched" out and tried a new location for photographing stuff... ba-dum-tsh!
 |
| Cute embroidered tiara- thanks, Mom-In-Law! |
 |
| I've really got to wash the garage gutters... |
 |
| Love those cutesy bindings! |
 |
| Here you can see the top stitch detail. It took forever! |
And... of course, the shower was beautiful too. It was at a cute little restaurant only a few blocks from my house that I'd never been to before! Very unusual and eclectic, with crazy colors all over. That being said, these photos were quite difficult to color correct!
 |
| Name reveal! Olivia Sandra-Lee (makes me think of Grease). |
 |
| So many cute fall details! |
 |
| "She MADE this!" :) |


Nicee post
ReplyDelete