A few friends and I have decided to meet up for craft night on random Mondays. Our first session was Halloween-themed!
I had been scouring Pinterest for cute ideas for weeks, and I finally decided on some string art, a giant googly-eye wreath and some beaded spiders... kind of like these:
I knew the string art would take the most amount of time (I decided on four different ones... doh!), so I prepped the wood pieces the week prior to craft night.
There were a bunch of pieces of 1x12" board hanging out in my basement for a while, which I probably bought to make something else out of but forgot about, so I grabbed those and brought them to work to cut into manageable pieces. After impressing some male coworkers with my table saw skills, I sanded the pieces up nice and smooth.
Next step: color. I had decided on four different shaped objects for my string art: a pumpkin, a cat against a full moon, a ghost in a circle, and some bats. The pumpkin was obviously destined to be orange, and I love the color of grey stain, so there's one. The cat and the ghost are both different in that the string goes on the negative space, so I wanted a black cat and a white ghost... black wood, white wood. And lastly, I really wanted to try my hand at "color washing", so I decided to put the bats on orange.

I started with the white and orange color washing. I have lots of leftover paint from making the walls in our house colorful (literally... no two rooms are the same color), including orange from the living room and light grey from our bedroom. I mixed a couple spoonfuls of paint with a jar full of water (shake it up good), and it turned out great! The resulting mixture was just thin enough to let the wood grain show through while leaving nice, rich color behind. It almost looks like that colored chalk stain you can get at the hardware store, but for pennies!
 |
| Jar of watery paint... or painty water? |
The black and grey boards were just colored with stain from other projects and an old sock. Socks work great for staining- they're absorbent and can be rolled into little fuzzy, spongy balls.
Pounding in the nails took FOREVER! Well, not really, but it seemed like a lot of nails. I think I went a little overboard and they're really close together, but oh well. I printed out stencils of the shapes I wanted, and pounded the nails directly through the paper. I'd probably do it differently next time... there are little itty bitty pieces of paper stuck under some of the nails that don't want to come out! I thought about soaking the wood in water to dissolve the paper, but I'm not sure what that would do to the finish. Oh well. Once the string is on, it won't really be visible.
 |
| A bit of paper stuck under the nails. Tweezers help. |
Finally, I had two pieces ready for craft night... the pumpkin and the cat. I didn't get too far. Ha ha.
I didn't realize how tedious it is to wrap that darn thread around all those nails! I had to take a break and work on other things for a while.
I attempted my wreath project, but it didn't go very well. Instead of burlap or that super wide mesh ribbon they make for wreaths, I thought I'd try to use up some leftover stuff from my wedding (three years ago...). I had purchased some funky lime green plastic webbing from save-on-crafts.com to use as runners for all the tables, and while it worked fantastically for its original purpose, it's just too stiff to stuff into the wire wreath form, even after being cut in half lengthwise.
 |
| Worked well for table runners! |
 |
| Yeah... no. |
I guess my cute lime green giant googly eye business cards that I picked up at the Toy Fair in New York last February will have to wait a little bit longer to be made into anything! Ha ha... yes, I stole two! If they didn't want people to take them, why would they have put out so many!?!? :)
After the failed attempt to make a wreath, I sat back for a moment to witness what the other girls were doing. Someone had brought Mod Podge and fake leaves to make fall candle holders out of mason jars. Or... try to make. I kind of had a feeling that those plastic leaves wouldn't work too great...
 |
| What it's supposed to look like... (and those are real leaves) |
 |
| How theirs turned out. Hmm... |
And our host Rose created a pretty fall P out of flowers for her daughter's picture session, and a couple matching headbands. Cute!
Then I busted out the jewelry making stuff. I wanted to finish
something! I ended up making my little bead spiders out of volcanic lava beads, seed beads, bugle beads and a few pieces of wire. They turned out cute! I'll post a tutorial for these quick little dudes soon...
Here's what I accomplished at the inaugural Monday Craft Night (and we weren't even drinking!):
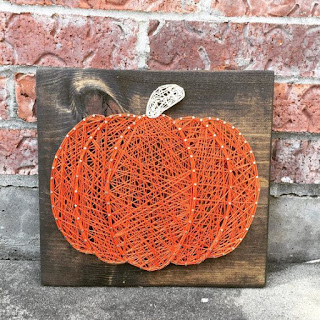
I have since finished the pumpkin string art and have begun on the cat... but clearly it and the rest of them will be ready for next Halloween instead of this one. Ha ha.
By starting on the outer sections and working towards the middle, I gave the pumpkin a bit of dimension.
I'm not sure if there's an established science to this art form, but on the cat, I started on one nail in a corner and wrapped thread around 4 opposite nails in order, then hopped to the next nail and repeated the process. You can see how there's more of a definite pattern developing in the thread... but I'm not sure if I like the gaps in the middle. I may go back and do 6 inner nails for each outer nail instead so the gaps close up a bit. I stopped here at a point where I wasn't sure what to do next. Ha ha... I'll figure it out eventually!
I never even got to try my other Pinterest projects I'd been
eyeing up. I guess next year's Halloween will be extra crafty!
 |
| Eyeballs in resin pendant... |
 |
| Eyeball skull on canvas... |
 |
| Creepy eyeball roses... |


Comments
Post a Comment