2020's IT Fashion Accessory...
I wish I were joking.

This pandemic has really given face coverings some leverage. Paris, New York, London... face masks have adorned lovely model faces at major fashion shows since early February.
Ok, so mine aren't quite that fancy. But they're effective, and I've gotten a lot of comments on how well they fit and how cute they are in comparison to the standard medical face mask.
I can't claim ownership to this particular method of constructing these masks; I followed the video tutorial recommended by the Wisconsin Face Mask Warriors, an organization collecting donations to provide masks to healthcare workers across the state. There were a few instructions I thought were lacking, so I'm going to go ahead and give you a written tutorial with descriptive pictures of my slight modifications to the video's process. After about 130 of these things, I don't think I'll ever forget how to make them!
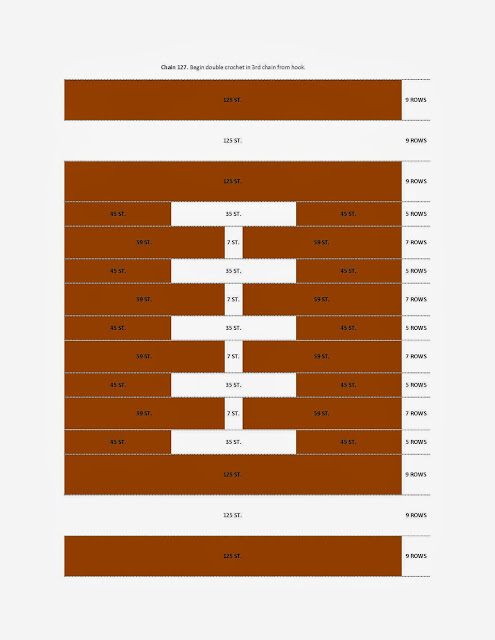
If you're using yardage, cut a 10 inch piece from the whole width of fabric, then trim off a 2.5 inch strip for the bias. Sub-cut the remaining 7.5 inch piece into 15 inch lengths. If you really want to squeeze out a third mask, shortening the length to 14 inches doesn't make a huge difference in the final product.
I used up a bunch of fat quarters I'd had sitting around for years, and I was able to get two complete masks per if I cut them like this:
Fold the mask pieces in half, right sides together, and make a mark on the top edges (opposite of the fold) 2 inches in from each side. *the original pattern called for serging or zig-zagging these raw edges, which I omitted. I didn't find it necessary.

Sew from the ends to the marks, back-stitching to secure the stitches at the marks. This creates the opening for the filter pocket. Press the seam open.


Starting at the top (which is actually the bottom of the mask), I pinched the fabric at the first inch marker and carried it down to the next inch marker, securing it with a pin. I then left an inch gap, and repeated the process twice more. I like to check to make sure my pleated mask is about 4 inches tall.

Repeat the same process on the other side, making sure the pleats go in the same direction. I give them an eyeball when they're finished to make sure each pleat is approximately the same size as its opposite, and that the mask is an even 4 inches on both ends.

Press the pleats in place from both sides.

Secure one side of the pleats with stitching.

Insert the nose wire into the pocket and sew up the other side of the mask pleats. *I started doing it this way because the wires kept sliding out all over the place if one side wasn't sewn shut first. If you're using pipe cleaners, they'll have been inserted already, so you can just sew them up right away.


Press the long edges in to meet the center crease.

Re-fold the strip on the center crease and press, creating a thin strip with the raw edges tucked inside.


Sew along the crease on each side of the mask, securing the ends with back stitches.

Flip the tape right sides out and press the side flaps down flat.

Re-fold the bias tape on the creases to conceal the raw edges of the pleats and press well.


Top stitch along the edge of the tape on the front side of the mask, back stitching to secure.


A forceps can be very useful here if you have a stubborn safety pin. I like to call mine the "cordyceps"... even though I know that's actually a type of fungus. Ha ha.

Ta da! You have a finished mask!

If you're using elastic, each side will look like this:
Place the loop over your head with the pocket side out.

Flip the mask up, adjust the nose wire, and tie the cord ends behind your head.


This pandemic has really given face coverings some leverage. Paris, New York, London... face masks have adorned lovely model faces at major fashion shows since early February.
 |
| A model wearing a Pitta Mask walks the runway for The Blonds during New York Fashion Week: The Shows at Gallery I at Spring Studios on February 09, 2020. (Photo by Roy Rochlin/Getty Images for NYFW: The Shows) |
Ok, so mine aren't quite that fancy. But they're effective, and I've gotten a lot of comments on how well they fit and how cute they are in comparison to the standard medical face mask.
I can't claim ownership to this particular method of constructing these masks; I followed the video tutorial recommended by the Wisconsin Face Mask Warriors, an organization collecting donations to provide masks to healthcare workers across the state. There were a few instructions I thought were lacking, so I'm going to go ahead and give you a written tutorial with descriptive pictures of my slight modifications to the video's process. After about 130 of these things, I don't think I'll ever forget how to make them!
1. Cut your fabric.
You'll need a 7.5 by 15 inch rectangle and about 10 inches of "bias" tape per mask (or 6.5 by 14 inches if you're making a kid's size). I say "bias" because technically, bias tape is cut on a diagonal and this is not; I think it wastes too much fabric.If you're using yardage, cut a 10 inch piece from the whole width of fabric, then trim off a 2.5 inch strip for the bias. Sub-cut the remaining 7.5 inch piece into 15 inch lengths. If you really want to squeeze out a third mask, shortening the length to 14 inches doesn't make a huge difference in the final product.
I used up a bunch of fat quarters I'd had sitting around for years, and I was able to get two complete masks per if I cut them like this:
 |
| Fat quarter is folded "hamburger" style. |
 |
| I like having a bit left over to create with. :) |
 |
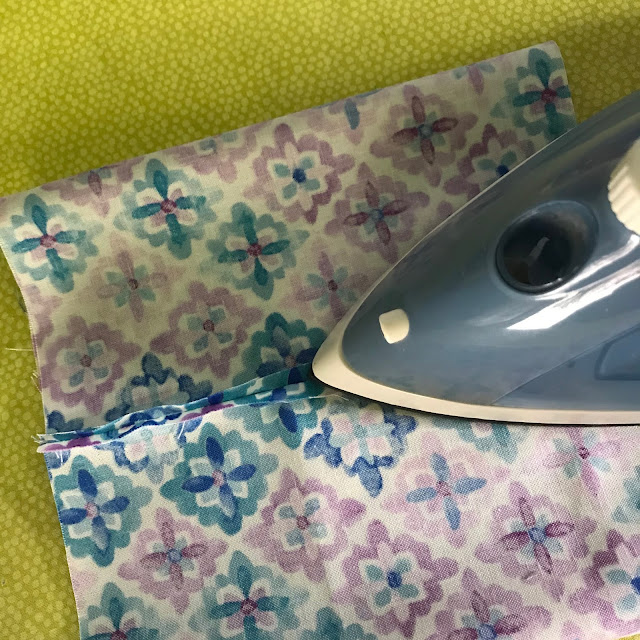
| Two masks' worth. Definitely press the pieces before continuing. Ha ha. |
2. Make the filter pocket.
Fold the mask pieces in half, right sides together, and make a mark on the top edges (opposite of the fold) 2 inches in from each side. *the original pattern called for serging or zig-zagging these raw edges, which I omitted. I didn't find it necessary.  |
| I stacked several to make the process quicker. |

Sew from the ends to the marks, back-stitching to secure the stitches at the marks. This creates the opening for the filter pocket. Press the seam open.


Top stitch the filter pocket opening. This is the step I found to be most cumbersome... you have to be careful to not catch any extra fabric while stitching. I devised a "tunnel check" method to make sure I was clear. It also helps to use the needle down position when you stop, so the fabric doesn't slide around as you check your tunnel.
 |
| Keep excess fabric out of the way by doing a "tunnel check". |


3. Make the nose wire pocket.
Turn the mask right sides out and press it flat, placing the pocket opening about one half to three quarters inch from the top edge. Sew along the line of stitches above the opening to make the nose wire pocket. *I originally started making these with twisted pipe cleaners as the nose wire (until I ran out). At that time, I inserted the pipe cleaner into the nose wire pocket before stitching it shut.


4. Pleat the mask.
This may take a little practice... it's ok! I like to place my face mask with the pocket opening face up and at the bottom on my cutting mat, lined up with the one-inch marks.
 |
| Placed for pleating. |
Starting at the top (which is actually the bottom of the mask), I pinched the fabric at the first inch marker and carried it down to the next inch marker, securing it with a pin. I then left an inch gap, and repeated the process twice more. I like to check to make sure my pleated mask is about 4 inches tall.

 |
| I like my masks to be 4 inches tall. |
 |
| One side pleated. |
Repeat the same process on the other side, making sure the pleats go in the same direction. I give them an eyeball when they're finished to make sure each pleat is approximately the same size as its opposite, and that the mask is an even 4 inches on both ends.

Press the pleats in place from both sides.


5. Create the nose wire.
I used a random spool of wire I found in my jewelry making supplies once my pipe cleaners ran out. I cut 7 inch pieces of wire and folded them in half for each mask. Make sure that the ends are rounded nicely and there are no sharp pokey things- if you wouldn't want it on your face, it's not gonna work. I really like a round-nose pliers for this. *if you make these ahead of time, the process goes much smoother. |
| Coil the ends to prevent pokeys. |
 |
| Fold in half smoothly. The goal is to not have any sharp points. |
Insert the nose wire into the pocket and sew up the other side of the mask pleats. *I started doing it this way because the wires kept sliding out all over the place if one side wasn't sewn shut first. If you're using pipe cleaners, they'll have been inserted already, so you can just sew them up right away.


7. Prepare the "bias" tape.
Press the long 2.5 inch strip flat, then fold it in half the long way and press a crease into the center.
Press the long edges in to meet the center crease.

Re-fold the strip on the center crease and press, creating a thin strip with the raw edges tucked inside.

8. Assemble the mask.
Cut two 5 inch pieces from your bias tape. This should be about an inch larger than the pleated edge of your mask. Open the tape pieces and pin the right sides flush to the raw edges on the back of the mask (where the opening is), wrapping the extra fabric around to the front.


Sew along the crease on each side of the mask, securing the ends with back stitches.

Flip the tape right sides out and press the side flaps down flat.

Re-fold the bias tape on the creases to conceal the raw edges of the pleats and press well.


Top stitch along the edge of the tape on the front side of the mask, back stitching to secure.


 |
| The mask itself is complete. |
9. Insert the cord/elastic
You'll need either a 4 foot length of cord or two 9 inch pieces of round or eighth-or-quarter-inch flat elastic, as well as a safety pin. A forceps is also a great help here.

Insert the safety pin though the end of your cord or elastic.

Identify the "path of least resistance" in the cord pockets... I like to choose the path shown because it doesn't have any of the pleats inside of it to catch the safety pin on.

If you're using cord, insert the safety pin into the path of least resistance from the side with the nose pocket. That way, the loop in the cord is on the bottom of the mask and you don't have to reset your safety pin. Inchworm the safety pin through the pocket and out the other side. Repeat on the other side, inserting the safety pin from the opposite direction.
If you're using elastic (lucky you!), just feed the elastic through each side and tie a knot or zigzag stitch it together, then hide the join inside the pocket.

A forceps can be very useful here if you have a stubborn safety pin. I like to call mine the "cordyceps"... even though I know that's actually a type of fungus. Ha ha.

Ta da! You have a finished mask!

If you're using elastic, each side will look like this:
 |
| Loops for around the ears. I used a double thickness because my "beading elastic" is very fine. |
To wear the mask (with cords):
Place the loop over your head with the pocket side out.

Flip the mask up, adjust the nose wire, and tie the cord ends behind your head.

I know it seems like a lot of steps, but I hope this was a more detailed walk-through on how to make these masks than the original video that was suggested. It really does start to go quickly once you get the hang of it!
Happy sewing! And stay healthy!

I use two layers of fabric and a layer of non-woven inter facing. I use 1-1.125yard of bias to make ties covering the raw edges over the pleats.
ReplyDeleteI just wish I could come with a faster way to gather the edges than pleats but the layers are the thick to gather. And sewing over the pleats is the hardest part for me.
That's another great way to make them! I don't have enough interfacing in my stash to make them that way, and I like the simplicity of using paracord instead of making a whole bunch of bias tape. :) There are so many ways to make masks!
DeleteThat is four layers not two layers that I use.
ReplyDeletegreat work
ReplyDelete