It's All Monkey Business
I babysat for the first time in 15 years last summer. (!)
I realize babysitting is not a huge deal for most people, but I am not most people. One time, when I was 16, I babysat two kids (I think they were 2 and 4) for a few hours while their parents went to league bowling. It was THE. LONGEST. THREE. HOURS. OF. MY. LIFE. All to make like fifteen bucks. I also realized- just recently, actually- that the two-year-old probably needed a diaper change while I was there, but I was so clueless that it never even occurred to me. I have yet to change a diaper. Ever.
Fortunately, my good friends' boys are beyond the diaper years, and, in fact, can wipe their own butts! I had to make sure before accepting the challenge... I am so not ready for that kind of responsibility. They're 7 and 6, so I mean, I assumed they'd be able to take care of that stuff on their own, but you never know!
So, yeah. The concept that someone would actually trust me to take care of their children for an entire day was honestly a bit flattering. But these two boys are seriously the best, and for some reason they love me.
A few months ago, I found some Fox River "monkey" socks on super clearance at Fleet Farm. I thought it would be fun to make some sock monkeys with the boys, so I bought a couple pairs. The next time I stopped by their place and told them my idea, and they were really excited. Apparently the older one had recently asked his mom to buy him a sewing machine because he wanted to learn how to make toys for his dog... I thought it might be best to start him off with a needle and thread.

This babysitting experience was the perfect opportunity to actually make the sock monkeys. It kept all of us busy! I brought some big yarn needles and some embroidery floss along, as well as a good fabric scissors to cut the socks apart. I had never done this before, but the instructions came with the socks and looked fairly straight-forward. I didn't take any pictures of the actual process with the boys (because I was busy hopping from one leg to the other ear back to the other arm), but I bought another pair of socks (they actually come in fours- for a whopping $4) to demonstrate for you here.

Sock A: the Body
Ok, the instructions on the packaging are pretty good for the first sock. They even have little illustrations and everything!

I basically followed the instructions exactly, only I used my sewing machine this time and it went so much faster than doing it by hand (duh).
1. With the first sock inside out, flatten the cuff so the heel is facing upwards. Draw a line up the center, about 7" long.

2. On each side of the line, sew along the open end of the sock, then pivot and sew up along the line about 6", using a 1/4" seam allowance.


4. Turn the sock right side out through the hole in the "crotch".

5. Begin stuffing the monkey's body and legs to your desired fullness. It's best to stuff it firmly to provide the monkey the strength to say upright.

6. This is where I deviated from the provided pattern a little bit. I wanted my monkey to be able to sit up on his own, so I sewed a little pouch of out of scrap fabric and filled it with dry rice. I made sure it was sized correctly to fit inside the body without being too lumpy. I also stuffed some fluff around it and made sure the legs were nice and full after inserting the rice pouch into the body.


7. Hand-sew up the "crotch" seams by turning in the raw edges a little bit and catching the second row of knit with invisible stitches.

8. Stand the monkey upright and determine how big you want his head. I used embroidery floss to tie the neck tightly, wrapping the floss around a few times, knotting tightly, and burying the ends into the body with a needle.


9. If desired, add little ankle bends by picking up a few stitches along the top of the legs.


Sock B: The Appendages
10. Set the body aside. Turn the remaining sock inside-out and lay it down flat. Following the diagram on the included instructions, draw out the tail, ears and arms, making sure not to cut into the heel, which will become the mouth. I left about 1/2" of the yellow all around the white part of the heel. You can also reserve the toe of the sock to make a hat for your monkey... but I chose not to.

This is where I messed up; I made my tail too wide, so the arms would have been too skinny if I had made them out of what was left. Good thing these socks come in packs of four!

11. Sew along the line for the tail and trim it from the rest of the sock. Turn it right side out and stuff. My tail is very wide; yours will likely be a bit skinnier (because of my oops noted above). I also made it very long, because I think it's cute. You can do whatever you'd like!

12. Cut out the ears. I like to pin the two layers together to prevent them from slipping around. Sew around the outer edges, leaving a small gap in the stitches to turn them right-sides out. I top stitched my ears to make them lie flat and close the turning hole. I just used a normal stitch on my sewing machine, which gave the ears a fun curvy shape. Adjust your machine to a stretch stitch if you don't like the curviness.

13. Make the arms exactly how you made the tail. Stuff them and set them aside.
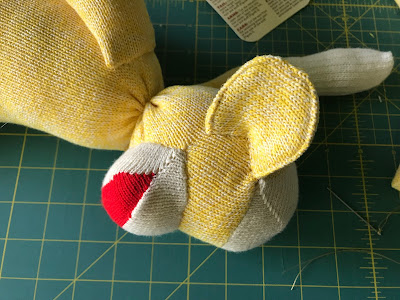
14. The heel should be the last remaining part of the second sock. Trim around the white part, leaving about 1/2" of the yellow. Now comes the fun part!

Place the mouth inside-out and upside down on the monkey's face. You can use pins in the corners of the mouth to hold it as you check the placement. The curvature of the sock heel should fit the shape of the bottom of the monkey's face (it will make sense when the pieces are in your hands!). Hand-stitch the bottom lip from corner to corner of the white areas.


Flip the mouth upward; it should now be right side out with the raw edge of the bottom tucked inside. Stuff the mouth, and begin stitching the upper lip down, tucking the yellow edge inside as you go.


15. Attach the remaining appendages and eyeballs (I just used dark brown buttons). Tuck the raw ends of the arms and tail inward and hand-stitch them in place.


I realize babysitting is not a huge deal for most people, but I am not most people. One time, when I was 16, I babysat two kids (I think they were 2 and 4) for a few hours while their parents went to league bowling. It was THE. LONGEST. THREE. HOURS. OF. MY. LIFE. All to make like fifteen bucks. I also realized- just recently, actually- that the two-year-old probably needed a diaper change while I was there, but I was so clueless that it never even occurred to me. I have yet to change a diaper. Ever.
Fortunately, my good friends' boys are beyond the diaper years, and, in fact, can wipe their own butts! I had to make sure before accepting the challenge... I am so not ready for that kind of responsibility. They're 7 and 6, so I mean, I assumed they'd be able to take care of that stuff on their own, but you never know!
So, yeah. The concept that someone would actually trust me to take care of their children for an entire day was honestly a bit flattering. But these two boys are seriously the best, and for some reason they love me.
A few months ago, I found some Fox River "monkey" socks on super clearance at Fleet Farm. I thought it would be fun to make some sock monkeys with the boys, so I bought a couple pairs. The next time I stopped by their place and told them my idea, and they were really excited. Apparently the older one had recently asked his mom to buy him a sewing machine because he wanted to learn how to make toys for his dog... I thought it might be best to start him off with a needle and thread.

This babysitting experience was the perfect opportunity to actually make the sock monkeys. It kept all of us busy! I brought some big yarn needles and some embroidery floss along, as well as a good fabric scissors to cut the socks apart. I had never done this before, but the instructions came with the socks and looked fairly straight-forward. I didn't take any pictures of the actual process with the boys (because I was busy hopping from one leg to the other ear back to the other arm), but I bought another pair of socks (they actually come in fours- for a whopping $4) to demonstrate for you here.

 |
| They were happy, I swear! They only look grumpy and rosy-cheeked because I made them get off the trampoline. |
Sock A: the Body
Ok, the instructions on the packaging are pretty good for the first sock. They even have little illustrations and everything!

I basically followed the instructions exactly, only I used my sewing machine this time and it went so much faster than doing it by hand (duh).
1. With the first sock inside out, flatten the cuff so the heel is facing upwards. Draw a line up the center, about 7" long.

2. On each side of the line, sew along the open end of the sock, then pivot and sew up along the line about 6", using a 1/4" seam allowance.

3. Cut along the line, making sure to cut beyond the stitching about 1". This will leave enough of an opening to stuff the monkey.

4. Turn the sock right side out through the hole in the "crotch".

5. Begin stuffing the monkey's body and legs to your desired fullness. It's best to stuff it firmly to provide the monkey the strength to say upright.

6. This is where I deviated from the provided pattern a little bit. I wanted my monkey to be able to sit up on his own, so I sewed a little pouch of out of scrap fabric and filled it with dry rice. I made sure it was sized correctly to fit inside the body without being too lumpy. I also stuffed some fluff around it and made sure the legs were nice and full after inserting the rice pouch into the body.


 |
| Well, this is awkward. |
7. Hand-sew up the "crotch" seams by turning in the raw edges a little bit and catching the second row of knit with invisible stitches.

 |
| Invisible Stitch |
8. Stand the monkey upright and determine how big you want his head. I used embroidery floss to tie the neck tightly, wrapping the floss around a few times, knotting tightly, and burying the ends into the body with a needle.


9. If desired, add little ankle bends by picking up a few stitches along the top of the legs.


Sock B: The Appendages
10. Set the body aside. Turn the remaining sock inside-out and lay it down flat. Following the diagram on the included instructions, draw out the tail, ears and arms, making sure not to cut into the heel, which will become the mouth. I left about 1/2" of the yellow all around the white part of the heel. You can also reserve the toe of the sock to make a hat for your monkey... but I chose not to.

This is where I messed up; I made my tail too wide, so the arms would have been too skinny if I had made them out of what was left. Good thing these socks come in packs of four!

11. Sew along the line for the tail and trim it from the rest of the sock. Turn it right side out and stuff. My tail is very wide; yours will likely be a bit skinnier (because of my oops noted above). I also made it very long, because I think it's cute. You can do whatever you'd like!

12. Cut out the ears. I like to pin the two layers together to prevent them from slipping around. Sew around the outer edges, leaving a small gap in the stitches to turn them right-sides out. I top stitched my ears to make them lie flat and close the turning hole. I just used a normal stitch on my sewing machine, which gave the ears a fun curvy shape. Adjust your machine to a stretch stitch if you don't like the curviness.

13. Make the arms exactly how you made the tail. Stuff them and set them aside.
14. The heel should be the last remaining part of the second sock. Trim around the white part, leaving about 1/2" of the yellow. Now comes the fun part!

Place the mouth inside-out and upside down on the monkey's face. You can use pins in the corners of the mouth to hold it as you check the placement. The curvature of the sock heel should fit the shape of the bottom of the monkey's face (it will make sense when the pieces are in your hands!). Hand-stitch the bottom lip from corner to corner of the white areas.


Flip the mouth upward; it should now be right side out with the raw edge of the bottom tucked inside. Stuff the mouth, and begin stitching the upper lip down, tucking the yellow edge inside as you go.


15. Attach the remaining appendages and eyeballs (I just used dark brown buttons). Tuck the raw ends of the arms and tail inward and hand-stitch them in place.


And you're done! You could add stitching across the mouth if you wanted, or add a bowtie around his neck, or make him a super cute stocking cap out of an orphan sock... In fact, this guy would be ADORABLE made from a pair of those colorful stripey knee-high socks! He would even be pretty fun to crochet too.
The weighted bottom makes the monkey so cute and pose-able, and he feels like he'd be right at home on a bookshelf next to a bunch of children's books.


Comments
Post a Comment