Repurpose for a Reason: more progress...
It's coming together!
I'm really excited about how the cushion cover turned out... and I have to say I've impressed myself. It looks pretty darn professional. And my product tester is happy. :)
I started by cutting the top and bottom fabrics to size. This particular suitcase is about 18.5" x 28.5", so I cut my rectangles to that size, plus an inch for my half-inch seam allowances.
The top of the bed is the only piece I cut out of the green pixel fabric. It's softer and cozier than the brown vinyl, but I really wanted to get a bit of the cute pattern onto the top surface, since the majority of the bed will be hidden within the suitcase. I decided to add some decorative corners- it looks adorable, and it makes the corners more durable in case Mr. Pooch likes to dig a little. Howie seems to like to stuff his nose in the corners (must smell interesting?), so I can imagine some digging might happen.
To add the decorative corners, I cut two 7" squares out of the brown vinyl, then cut them in half diagonally. I lined them up on the corners of the green fabric, then flipped them, lining up the points a half inch in (for a quarter inch seam). I drew a line 1/4" from the edge and pinned the pieces in place, then sewed them down.
I then folded the triangles down and matched up the corners, pinning them down just because the brown vinyl is a bit stiff and couldn't be ironed. I then ran a double line of top stitching along the folded edge to secure the triangles and add a bit of polish.
Since the corners of the suitcase are rounded, I couldn't just make a rectangular block to stick in there. I measured the radius of the corners with my clear acrylic quilting ruler, and transferred that measurement (3") to a little square of cardboard from a fat quarter. Cheap templates! :)
I cut the corners off to match the template, then slid it inward a half inch and drew a stitch line. This probably wasn't necessary, but it seemed to help me while I was pinning the pieces together.
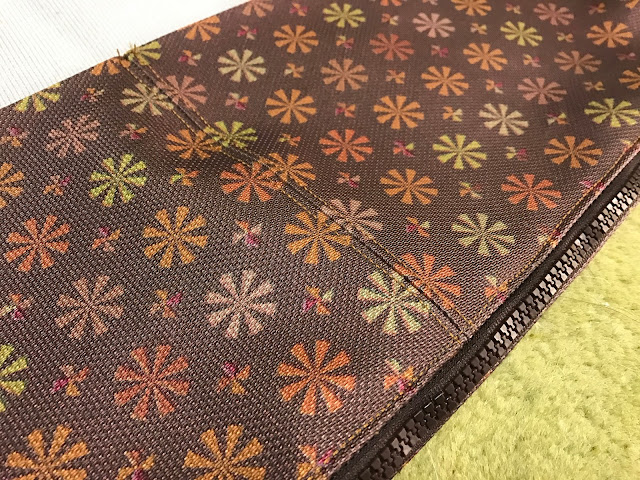
The sides of the bed cover were pieced together out of 7" strips of brown vinyl. I just used the length of the fabric I had available plus a smaller chunk, so I ended up having two seams in the front and one in the middle of the back, but I actually really like where they're placed. I pinned the strips all the way around the bottom, following the curved corners and clipping them after they were sewn. I added top stitching to all the seams (much to my sewing machine's dismay) to make them look finished and to keep the seams from being too bulky.
I put a zipper along the bottom back edge, which in hindsight was probably not the easiest place to put it. I should have cut the back side panel in half the long way, inserted the zipper, and then put the bed together like a simple tote bag... but no. I had to make it difficult. I can't even really explain what the heck I did to make this work. But it does, so I'll take it.
My sewing machine HATES this fabric. Or maybe it's the heavy duty thread it doesn't like. But in any case, I had to make some serious adjustments to get nice, even stitches. The default tension setting on my machine is about 4.6... I had to crank it up to 10 to avoid a disastrous rat's nest of thread all over the back of everything. There are a few spots inside the cover where something went haywire, but I made sure to keep all the nice stitching on the outside, so you can't even tell.
Boy, was it a challenge to do the last bit of top stitching once I got the top piece on. Finagling the stiff, bulky fabric around under the needle with only the zipper hole as an opening... holy moly! There's got to be a better way. Ha ha. I decided to not put top stitching around the top surface, and I think it works.
Oh well! Live and learn. I'm so happy with how it turned out, despite the challenges. I can't wait to add the toy pockets and cute embellishments to the suitcase and get it all finished up!
I'm really excited about how the cushion cover turned out... and I have to say I've impressed myself. It looks pretty darn professional. And my product tester is happy. :)
I started by cutting the top and bottom fabrics to size. This particular suitcase is about 18.5" x 28.5", so I cut my rectangles to that size, plus an inch for my half-inch seam allowances.
The top of the bed is the only piece I cut out of the green pixel fabric. It's softer and cozier than the brown vinyl, but I really wanted to get a bit of the cute pattern onto the top surface, since the majority of the bed will be hidden within the suitcase. I decided to add some decorative corners- it looks adorable, and it makes the corners more durable in case Mr. Pooch likes to dig a little. Howie seems to like to stuff his nose in the corners (must smell interesting?), so I can imagine some digging might happen.
To add the decorative corners, I cut two 7" squares out of the brown vinyl, then cut them in half diagonally. I lined them up on the corners of the green fabric, then flipped them, lining up the points a half inch in (for a quarter inch seam). I drew a line 1/4" from the edge and pinned the pieces in place, then sewed them down.
I then folded the triangles down and matched up the corners, pinning them down just because the brown vinyl is a bit stiff and couldn't be ironed. I then ran a double line of top stitching along the folded edge to secure the triangles and add a bit of polish.
Since the corners of the suitcase are rounded, I couldn't just make a rectangular block to stick in there. I measured the radius of the corners with my clear acrylic quilting ruler, and transferred that measurement (3") to a little square of cardboard from a fat quarter. Cheap templates! :)
I cut the corners off to match the template, then slid it inward a half inch and drew a stitch line. This probably wasn't necessary, but it seemed to help me while I was pinning the pieces together.
The sides of the bed cover were pieced together out of 7" strips of brown vinyl. I just used the length of the fabric I had available plus a smaller chunk, so I ended up having two seams in the front and one in the middle of the back, but I actually really like where they're placed. I pinned the strips all the way around the bottom, following the curved corners and clipping them after they were sewn. I added top stitching to all the seams (much to my sewing machine's dismay) to make them look finished and to keep the seams from being too bulky.
I put a zipper along the bottom back edge, which in hindsight was probably not the easiest place to put it. I should have cut the back side panel in half the long way, inserted the zipper, and then put the bed together like a simple tote bag... but no. I had to make it difficult. I can't even really explain what the heck I did to make this work. But it does, so I'll take it.
My sewing machine HATES this fabric. Or maybe it's the heavy duty thread it doesn't like. But in any case, I had to make some serious adjustments to get nice, even stitches. The default tension setting on my machine is about 4.6... I had to crank it up to 10 to avoid a disastrous rat's nest of thread all over the back of everything. There are a few spots inside the cover where something went haywire, but I made sure to keep all the nice stitching on the outside, so you can't even tell.
Boy, was it a challenge to do the last bit of top stitching once I got the top piece on. Finagling the stiff, bulky fabric around under the needle with only the zipper hole as an opening... holy moly! There's got to be a better way. Ha ha. I decided to not put top stitching around the top surface, and I think it works.


Comments
Post a Comment